Thursday, April 28, 2011

21 Ways to Sell Your House Faster!


  1.  Start with the outside. It will make the first impression. Make sure grass and shrubs are trimmed. Sweep the sidewalks and pull up weeds. Set a few colorful potted flowers around the entry.
  2. The front porch should be clear of any toys or clutter that doesn’t belong there.
  3.  Paint the front door if needed. A nice welcome mat can also help. Repair things outside that are broken.
  4. Inside the house you should start at the entryway and work your way through the house. Make sure the entryway is clear of everything including shoes and jackets. Put them neatly away in closets. You want as much room as possible in the entryway so it doesn’t feel crowded.
  5. If you have color on the walls consider painting them a neutral or off white. It makes the room brighter and bigger. Touch up doorframes and window frames if needed.
  6. Pack things for moving that are rarely used to clear up some space. Use this time to throw out or donate items that you will not be taking with you. Eliminate as much as possible.
  7. Furniture should be placed where it allows the most space. Don’t block traffic flow. If you have a fireplace, arrange the furniture to focus on that. If you have a lot of furniture, consider storing some pieces until the move. The less amount of furniture, the bigger a room will appear.
  8. Make sure the rooms are serving their purpose. If it is a dining room, make it look like a dining room. Get everything out that doesn’t go in a dining room.
  9. Kitchen counters should be clear. Organize mail and papers into baskets. Pack up dishes and cookware that are not being used. Clear out as much from your cabinets as possible. Potential buyers will open your cabinets to see about storage and space. Make it look organized! Store appliances like the toaster in the cabinets to clear the countertops. Take magnets and personal items off of refrigerator.
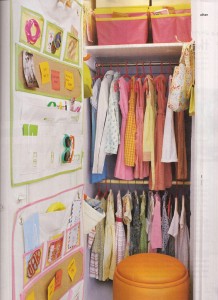
  10. Bedrooms, especially the master bedroom, should be clear of clutter. Beds should be made. Eliminate furniture pieces if needed to create more space. Closets and dressers should be neat and organized. Clear off the tops of dressers. Use decorative boxes such as hat boxes to hold items that go on top of dressers.
  11. Take personal items such as photos and collectibles down. Hang only decorative items and keep those to a minimum.
  12. Bathroom countertops should be cleared off. Put out a nice set of hand towels. Use baskets to store products and put them in a closet of under the sink. Make sure the shower curtain is pulled closed.
  13. Clean, clean, clean! Wipe down all surfaces. Countertops, dressers, mirrors, windows, tables and any other surface that catches dust and dirt. The kitchen and the bathrooms should be especially clean.
  14. Floors should be swept and vacuumed. Keep clothes and toys off the floor. If your carpet is dirty, rent a carpet cleaner or have them professionally cleaned.
  15. Empty all your wastebaskets. Especially in the bathrooms.
  16. Open your blinds and curtains to let in as much light as possible.
  17. Replace light bulbs and screws where needed. Patch large holes in the walls and fix leaky faucets.
  18. Smells such as fresh coffee or baked cookies can make a house very inviting. Be careful with scents because everybody has different taste. The important thing is for your house to smell pleasant. Odors from cooking or pets are a big turnoff.
  19. Soft music or sounds of nature playing in the background will make your house feel comfortable. If possible have the fireplace going to create a warm, inviting feeling.
  20. Overall you want a buyer to come into your home and be able to see them and their family relaxing and enjoying themselves. You don’t want them to see anything that will make them think of cleaning or repairing things.
  21. Place fresh flowers around the house to liven up areas. Set out fresh fruit in the kitchen, make sure it is fresh! Put a bowl of mints on the coffee table. Create a warm and inviting environment. 
 

Tuesday, April 26, 2011

Get Your Craft On Linky Party!


Stop by Todays Creative Blog and visit GET YOUR CRAFT ON! 

You will find so many fun and inspiring projects!


Monday, April 25, 2011

Painting Plaques

Today I am sharing some ideas for painting wooden plaques. They are really inexpensive and make great gifts or kid's projects!


Thursday, April 21, 2011

Organizing Your Closet

image credit

With an organized closet, you can save yourself time, energy and money. No more time and energy wasted on looking for clothes, ironing clothes that have been under a big pile, and wasting money by buying more because you can’t find what you already have. Start getting organized with these tips:
  • Take everything out of the closet and put it in DONATE, KEEP, LONG TERM STORAGE, and TRASH.
  • Group like items together such as scarves, hats, handbags, and so on. Clothes should be grouped together by season.
  • Get rid of wire hangers! Pick up a pack of plastic or wooden hangers each time you go to the store and begin weeding out those wire ones.
  • Use a shoe rack to organize shoes.
  • Keep the boxes for shoes you rarely wear. Label the outside of the box to find it easier when you need them.
  • Group shoes by category such as work out shoes, dress shoes, summer sandals and so on.
  • You can also use a clear plastic over the door shoe bag to hold small accessories such as pantyhose, scarves, hats or belts rolled up.
  • Use wire baskets or canvas bins on the top shelf to hold handbags or off season items.
  • Put hanging canvas shelves on your rod to hold folded items that cannot or should not be hung.
  • Clear plastic stackable drawers or cardboard dressers are great to put in the bottom of the closet to hold blankets or work out clothes.
  • If you’re really tight on space, try putting your heavy blankets or off season clothes in vacuum seal bags.
  • If you only have one rod for your clothes to hang on, consider installing a second rod below for shorter items.
  • Use as much vertical space as possible in your closet.
  • Label bins and containers to make maintaining organization easier.
  • If you have a hard time letting go of clothes, put hangers on the rod backwards. Each time you wear an outfit, hang it the right way. At the end of the season, all clothes still hanging backwards need to go!
  • Hang like items together, this way you see how may pairs of black pants you really have. Enjoy your new organized space!

Wednesday, April 20, 2011

Welcome Burlap Banner

I love love love working with burlap! It is inexpensive and makes anything you put with it look great. Here is my latest quick project with burlap.

 I cut out my squares of burlap by tracing a sheet of paper and tore a long strip of a canvas drop cloth that I had already. You can use any kind of fabric or ribbon for this.

Hot glue the squares to the fabric banner.

Stencil the letters onto the burlap with craft paint and a sponge or brush.
 

I ripped pieces of canvas cloth and tied them around the banner between the letters.

 Fray the ends and the sides as much as you want to.

Hang!

Tuesday, April 19, 2011

WOOD PLANK MAT

I am loving this fabulous mat. I have an some old wood planks in my shed just screaming for this!!! I know what I am doing this weekend...... and I was thinking I may add some stenciling.....


Monday, April 18, 2011

Painting Your Own T-Shirt

My little sister wanted to buy a Beastie Boys t-shirt but didn't find one that she liked. SO OF COURSE, we had to make one. It is super easy and fun to do at birthday parties. You can paint on stained t-shirts to give them new life! She bought a men's t-shirt from Old Navy for only $5.
 This is a great way to recycle kid's old clothes!
 I used acrylic craft paint and mixed a small amount of textile medium to it.
Then carbon copied the logo that we wanted onto the shirt.
 Don't forget to put cardboard between the front and back of the shirt to prevent bleeding through. (I used a cereal box)
Follow the directions on the textile medium bottle and heat set the fabric after it is dry. 
The darker colors will fade some in the wash but letting it set for a week before washing will help.

Friday, April 15, 2011

Re-Purposed Cereal Boxes

I don't know about you but my family goes through cereal boxes like crazy! We eat cereal for late night snacks several times a week! So I usually fold the boxes down and keep them for homeschool projects. Here is one way we reuse them.


It's Addy's poetry book. I used the fold that was already there to make it easier. I folded a piece of paper in half and lined it up with the crease in the box. Then traced the paper to make my cover outline. I cut out the cover and folded the book and the papers together. Using a thick needle and some thick thread I sewed the book together in the crease. You can also punch holes and use yarn or ribbon.

There are countless tutorials online that range from really easy to really difficult.

Thursday, April 14, 2011

Cleaning Your Shower

Okay so today is not an exciting post but I like to do something on organizing and simplifying every week and last night in the shower I thought I should share my lazy but effective way of cleaning my shower. I bought a dish washing brush last year but I like sponges better for washing dishes so instead of throwing out the brush I decided to try it in the shower. Over a year later I am still using the same technique (different brush now).

I have always hated cleaning the bathtubs and by the time I forced myself to do it I had too much scrubbing to do from postponing it. It left me grumpy with a hurt back. If this sounds like you then you may benefit from using a dish brush as well. I used dish soap for a while in it but now I don't use anything because I wipe the shower down with vinegar every few weeks. I don't have to scrub because in between the more thorough cleans I maintain it with my brush. Wow, I can't believe I wrote so much on a little dish brush.... heehee

Wednesday, April 13, 2011

Bread from Scratch

That's right, you heard read me, I made bread from SCRATCH baby! As part of our Earth Day Project that Addy and I are doing for school, we are finding ways to use fresher products around the house. So we figured, why not make bread? So I searched many different sights and found the most kid-friendly (and mommy-friendly) recipe to try. Wellllll, the first batch didn't even rise so we tossed it and chalked it up as a good first try and I found another recipe that worked GREAT! 
                     I am excited about the money savings and the health benefits of accomplishing this task but I am most proud that I just did it. If you know me, you know I am fascinated with "the good ole days". I love to talk to my grandparents about lifestyle back then and how they spent their time. You know, before Wal-mart and Target and internet.... 
                              Don't get me wrong now, I am a HUGE Target shopper and I love to spend lots of time there. 

There is just something intriguing to me about the idea of living in the 30's and 40's but Lord knows I love technology and wouldn't last a week back then. 

     But the biggest reward of it all is watching Addy mix and pour and get messy in the kitchen. She is so proud of herself and I hope these things are instilling in her a sense of gratitude and appreciation for things that she will carry on to adulthood.
So, here are some pics of our DELICIOUS bread! 


 We mixed the ingredients according to the recipe, the key was to add the flour slowly.

We waited an hour for the dough to rise......
 
  and then shaped it into a loaf and left it for another 30 minutes

Not bad for the first, well second try. (we didn't even get past the second picture the first time)
We also made pancakes from scratch since we had the ingredients out. 

Tuesday, April 12, 2011

Earth Day

Earth Day is less than ten days away and I have to say that I have learned so much in the process of teaching Addy about it. I use the word teaching lightly because we are both learning. We have been reading library books and watching dvd's and looking online at different ways to help the Earth and make it a cleaner place. We discussed how Indians believed that we belong to the Earth but we act as if the Earth belongs to us. WOW! That struck a chord in me because it is so true. Earth was here long before little me and long after little me but yet my small existence on this Earth that God created leaves a long lasting scar of garbage and pollution. "How dare I!" I ask myself. So then I ask myself, "What are you going to do about it?" 

So Addy and I are looking at what we can change and how we can save energy and reduce waste. I want her to understand this now, not when she is 30 like me! Imagine how much she can do if she starts when she is 8 years old. I hope she will remember this time that we are doing these things together and passes them on to her children. Some of the small changes we made or are making are...

Eliminating cleaning products in our home and using only vinegar, water and baking soda (we have been doing this for over a year and I love it. It saves me money and time as well)

Cloth diapering with Anna (also saving me LOTS of money!)

Using cloth wipes instead of disposable while at home (more money saved....)

Using fresh produce when possible to eliminate the need for preserving (uses energy)

Cooking enough meat for a couple meals at one time (saves time and energy)

Using leftovers in other meals to eliminate waste, or making much smaller meals to avoid having a lot of leftovers (less prep work = less energy used)

Washing all laundry (except diapers) in cold water

Line drying when possible or drying for half the cycle time and using lower heat (saving me money)

Use cloth napkins instead of paper (money saved!) I keep paper ones packed up for when company wants to use them

Turning off TV and lights when we leave a room

Consolidating our errand running to one or two days a week

Re-purposing items when possible, plastic containers, egg cartons, stained and torn clothes into cleaning rags, etc.

We hope to start our vegetable garden this year but if not, we buy locally to support community farmers (they aren't brought here by trucks that pollute)

Things I really want to work on and do better at: 
Not using plastic water bottles, I filter it for home but I am having a hard time giving up the convenience of the quick grab and go

My thermostat setting! My husband and I both struggle with this. We adjust it based on comfort instead of turning on a fan or putting on more clothes

Recycling, I feel we could do more than we already do. There is always more in this area to do better in.
So, I hope you will be inspired by the beautiful Spring season around you and make some positive changes in your homes to make this Earth the Earth that God created it to be. PLEASE SHARE YOUR EARTH FRIENDLY TIPS!!! That in itself is helping because you never know who will be inspired by you!


What's for dinner?

 Check out this great idea from A Girl and a Glue Gun.

Monday, April 11, 2011

Playroom Tree Mural

My playroom/schoolroom has been a work in progress all school year but it is starting to come together. I stared at a large blank wall for weeks trying to decide what I wanted to do and in the end I went with a tree that we could use for many different things. I figured this way I wouldn't get tired of it so quickly (as I tend to do). I plan to use it to display artwork and use later as a teaching tool for my little one. For example, making it a letter tree, teaching seasons, teaching about animals and insects, etc. I free handed the tree but you can use a projector to make it easier. My inspiration came from here.

 I used acrylic craft paints and a butter lid (I know, I am a professional)


 I roughly used my brush and made my lines of my tree.
It took my three coats to get my tree as dark and defined as I wanted it.


I cut out multiple leaves and my owls from scrapbook paper. 
I am most excited about using different themes with paper!


 I used painters tape to tape the leaves on the tree in no particular order.
So there it is, my playroom/schoolroom in progress!