Tuesday, September 6, 2011

Learning place value today! We used the back of some wrapping paper we already had and made a chart to tape to our dry erase board. Everyday I will give her a number to write on there for review. I am going to integrate NC history by using population numbers and records when possible.

This message was sent using the Picture and Video Messaging service from Verizon Wireless!

To learn how you can snap pictures and capture videos with your wireless phone visit www.verizonwireless.com/picture.

Note: To play video messages sent to email, QuickTime� 6.5 or higher is required.

We keep losing our "bookmarks" this year, mostly because we are using post its, scrap paper and Addy even resorted to a bobby pin. So today I gave her some scrap ribbon and a few paper clips and she stayed crafty for about half an hour making these. It was an easy, clean craft and we are using most of them already.

Wednesday, August 31, 2011

Book Study

We are starting our book study and author study with James and the Giant Peach by Roald Dahl. This is by far the most exciting part of our days right now! We snuggle up while Anna naps and take turns reading aloud to eachother. We stop a lot to discuss the vocabulary words and use context clues to figure out meanings. Roald Dahl has a great ability to describe things in interesting and funny ways so we are getting some laughs along the way.
We also decided to make a skit of one of the scenes in the book. While we are still deciding what scene (because there are so many great ones), I am so excited about making the backdrop, props and costumes to go with it! I definitely plan on making a large paper mache peach as a prop... could be messy! Can't wait!

Friday, August 26, 2011

Addy is making a poster today with her 4th grade goals on it. I asked her to imagine the end of this school year. What things do we what to say we accomplished and experienced? Of course there are hundreds of things but this is a great start. I imagine we will read this several times during those long, cold winter days to find motivation and inspire us again and again.

Well our first day back was very relaxing and nice! Addy started off the day by making us pancakes all by herself. We looked at all her books, websites and supplies today while discussing the best way to use them and stay organized. Even though I don't have a set in stone schedule this year, we still went over a general time line for our day and how it will flow (most days). Addy seems eager to learn and I can't wait to see what God has planned for us this year!

Wednesday, August 24, 2011

Saturday, August 6, 2011

Homeschooling Again

We made it through our first year of homeschooling and even decided to do it again this year!  Last year was one of the most amazing years of my life so far. I had our second baby girl and took on the incredibly intimidating, scary task of homeschooling my third grade daughter.
I have to say it was an interesting year and we both did a lot of growing and learning. I struggled in the beginning with the pressure of being a perfect teacher and making sure that I was organized and well planned. I am an organized person in general but I am talking picture perfect and unrealistic organization here. There was an overwhelming amount of information out there about homeschooling and the different methods and curriculums that I should or shouldn't use. I am grateful for technology and the resources available to me but enough was enough!
I was so worried about getting it perfect that it was making me lose sight of the real reasons I decided to homeschool to start with. So, I decided to take this summer and figure out what I really wanted to make this year be like. Well, the school year is starting in less than three weeks and I am so excited about this year! Not like I was last year but in a calm peaceful way. I have a peace about this year that I didn't have last year. Again, don't get me wrong. I am so thankful for the amount of free resources available to me and I can't imagine how I could ever do without it. But I am free of the burden to do everything I see. I want our time together this year to be about quality not quantity. I want her to feel free to be creative and not feel the rush of a schedule and to-do list. I want her to take time to enjoy the moments and feel fully present in each moment. I want her to laugh about things and find joy in learning. But most of all I want her to find God in everything she does, to see that she needs Him all day everyday. Not just prayer time before bed or before we eat or on Sundays. The only way for her to see these things is to see ME doing these things. I read yesterday that we should not be worried that our children don't listen to us, we should worry that they are watching us. Yeah, that's pretty deep... ouch! So as we begin this next journey I open myself up to learn just as much, probably more, than she does. I will be fully present in each moment. I will begin the transformation of her being dependent on me and her daddy to being fully dependent on Jesus Christ. Our success will not be defined by keeping up with the best mommy blogs or doing every print out and neat craft that we see, or by how many subjects we cram into one day, or how fast she can multiply or divide or say the state capitals. Our success will be defined by LOVE. A Christ like love that we spread around like wildfire and touch as many people as we can. We will find joy in each day as we do math problems, reading, writing, and history.
So I plan to blog as a journal of things we do throughout the year and reflect on things. Hopefully it will inspire and help another mommy that gets sucked into the pressure of perfection. I will surround myself with things that will keep me on path and I will for sure get lost and need to redirect but I know I can do it with the Lord by my side. So bring on 2011-2012 school year cause I am ready!

Thursday, May 12, 2011

DIY Bottle Cap Necklace

My stepfather was cleaning out his junk drawer and was throwing away a ton of bottle caps! Luckily I was there just in the nick of time to save them! Heehee
So my first project is a bottle cap necklace that I made with two preschoolers and a third grader. It was soooo easy. 


Using a nail and a hammer, put a hole in the top of the bottle cap.

I had some small silver necklace rings that I put on with pliers.

The letters are printed off my computer. I searched for monogram letters and played around with sizing. The girls colored the letters and I cut them out. I painted the bottle cap with acrylic paint and let it dry. Seal everything with fabulous mod podge.

We learned about symmetry and patterns while stringing beads. (You know I will squeeze in a lesson if I can!)


 Make sure the necklace will go over their heads and then tie a double knot.

Tuesday, May 10, 2011

Easy Dry Erase Board

 I can't believe tomorrow is Wednesday already! After an eventful weekend I guess I am just starting to come back to reality. So, most of you know that I babysit children part time out of my home and among my many part time endeavors I seem to always come back to keeping children. I guess it is my "calling" or something because when I am not keeping children I feel like something is missing in my life. I feel like it is my way of making a difference in this world. Impacting a child is one of the most important things you will ever do. I hope that through the diaper changes and preschool lessons that I show them how beautiful and wonderfully made they are. I also pray to be a blessing to the parents in a small way by giving them comfort in their long work days that their children are in a loving environment. With that said, I had a few children here today and realized that I needed a way to SIMPLY organize schedules and keep up with them. So I dug out a dry erase board from Addy's homeschool stuff and got the glue gun out!

 I bought a large piece of marker board from Lowes at the beginning of the year and had them cut it into 8 smaller pieces. It was SUPER cheap at only $10 bucks! I used painters tape to cover the edges because they were a little rough.
 I hot glued some ribbon around the edge. When I got to the corner I pinched it together and then folded it down flat.


Then I flipped it over and glued a piece of ribbon to hang it with.

Tied on a bow.....

 and hung it up! I used it immediately as you can see!

Friday, May 6, 2011

Making Your Own Foaming Dish Soap

 You know I like to share anytime I find a frugal tip so here is one that I've been doing and still love the results. I don't have a dishwasher yet but HOPEFULLY I will get one soon. In the meantime, I have become an expert dish washer myself. I love the foam dish soap, something about the foam makes me think my dishes are getting cleaner (I know it probably doesn't mean anything). I found this tip here on making my own from regular dish soap so I tried it and I am still loving it!

I use about half water and half regular dish soap and stir them together in the container. The tutorial I found is a little different. You may just need to experiment with yours a couple times to see which works best for you.


Wednesday, May 4, 2011

Recycling Project

Well, we FINALLY did it! We are "officially" recycling. I would like to say we already did but it wasn't to the extent that it should have been (and still isn't to be honest, but we are getting better). Things slipped through to the trash and we were lazy about it
All it really took was a quick look at what our town's recycling guidelines were. I printed out the ALLOWED and NOT ALLOWED things off the computer and gave them to Addy to start her creative juices flowing. Now that I have a better understanding of what can and cannot be put into our recycling bin it is so much easier and if I forget I have Addy's brightly colored sign to remind me!


Tuesday, May 3, 2011

It's Tuesday!

My two favorite Linky Parties are on Tuesdays! 

Tip Me Tuesday at Tip Junkie 


and Get Your Craft On Tuesday at Today's Creative Blog


Check them out and get some great ideas!
Here are some of my favorite ones from today.....


 I am using this idea for a baby shower!


You know I love this! Educational and Recycle!!

HAVE FUN & GET CREATIVE!

Sunday, May 1, 2011

Mother's Day Poem

I have been using this poem for years as a Mothers Day project for preschoolers. It STILL makes me cry!
Just put a child's handprint on a flower pot, frame, card, etc. and print out this poem. Don't forget to put the date on it.  Great for Grandmas too!
 To My Mommy, 
Sometimes you get discouraged
Because I am so small
And always leave my fingerprints
On furniture and walls
But every day I'm growing --
I'll be grown some day
And all those tiny handprints
Will surely fade away
So here's a little handprint
Just so you can recall
Exactly how my fingers looked
When I was very small 


Tip for making handprints: Use a paintbrush or sponge to apply paint to hand. 


Thursday, April 28, 2011

21 Ways to Sell Your House Faster!


  1.  Start with the outside. It will make the first impression. Make sure grass and shrubs are trimmed. Sweep the sidewalks and pull up weeds. Set a few colorful potted flowers around the entry.
  2. The front porch should be clear of any toys or clutter that doesn’t belong there.
  3.  Paint the front door if needed. A nice welcome mat can also help. Repair things outside that are broken.
  4. Inside the house you should start at the entryway and work your way through the house. Make sure the entryway is clear of everything including shoes and jackets. Put them neatly away in closets. You want as much room as possible in the entryway so it doesn’t feel crowded.
  5. If you have color on the walls consider painting them a neutral or off white. It makes the room brighter and bigger. Touch up doorframes and window frames if needed.
  6. Pack things for moving that are rarely used to clear up some space. Use this time to throw out or donate items that you will not be taking with you. Eliminate as much as possible.
  7. Furniture should be placed where it allows the most space. Don’t block traffic flow. If you have a fireplace, arrange the furniture to focus on that. If you have a lot of furniture, consider storing some pieces until the move. The less amount of furniture, the bigger a room will appear.
  8. Make sure the rooms are serving their purpose. If it is a dining room, make it look like a dining room. Get everything out that doesn’t go in a dining room.
  9. Kitchen counters should be clear. Organize mail and papers into baskets. Pack up dishes and cookware that are not being used. Clear out as much from your cabinets as possible. Potential buyers will open your cabinets to see about storage and space. Make it look organized! Store appliances like the toaster in the cabinets to clear the countertops. Take magnets and personal items off of refrigerator.
  10. Bedrooms, especially the master bedroom, should be clear of clutter. Beds should be made. Eliminate furniture pieces if needed to create more space. Closets and dressers should be neat and organized. Clear off the tops of dressers. Use decorative boxes such as hat boxes to hold items that go on top of dressers.
  11. Take personal items such as photos and collectibles down. Hang only decorative items and keep those to a minimum.
  12. Bathroom countertops should be cleared off. Put out a nice set of hand towels. Use baskets to store products and put them in a closet of under the sink. Make sure the shower curtain is pulled closed.
  13. Clean, clean, clean! Wipe down all surfaces. Countertops, dressers, mirrors, windows, tables and any other surface that catches dust and dirt. The kitchen and the bathrooms should be especially clean.
  14. Floors should be swept and vacuumed. Keep clothes and toys off the floor. If your carpet is dirty, rent a carpet cleaner or have them professionally cleaned.
  15. Empty all your wastebaskets. Especially in the bathrooms.
  16. Open your blinds and curtains to let in as much light as possible.
  17. Replace light bulbs and screws where needed. Patch large holes in the walls and fix leaky faucets.
  18. Smells such as fresh coffee or baked cookies can make a house very inviting. Be careful with scents because everybody has different taste. The important thing is for your house to smell pleasant. Odors from cooking or pets are a big turnoff.
  19. Soft music or sounds of nature playing in the background will make your house feel comfortable. If possible have the fireplace going to create a warm, inviting feeling.
  20. Overall you want a buyer to come into your home and be able to see them and their family relaxing and enjoying themselves. You don’t want them to see anything that will make them think of cleaning or repairing things.
  21. Place fresh flowers around the house to liven up areas. Set out fresh fruit in the kitchen, make sure it is fresh! Put a bowl of mints on the coffee table. Create a warm and inviting environment. 
 

Tuesday, April 26, 2011

Get Your Craft On Linky Party!


Stop by Todays Creative Blog and visit GET YOUR CRAFT ON! 

You will find so many fun and inspiring projects!


Monday, April 25, 2011

Painting Plaques

Today I am sharing some ideas for painting wooden plaques. They are really inexpensive and make great gifts or kid's projects!


Thursday, April 21, 2011

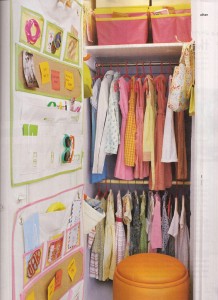
Organizing Your Closet

image credit

With an organized closet, you can save yourself time, energy and money. No more time and energy wasted on looking for clothes, ironing clothes that have been under a big pile, and wasting money by buying more because you can’t find what you already have. Start getting organized with these tips:
  • Take everything out of the closet and put it in DONATE, KEEP, LONG TERM STORAGE, and TRASH.
  • Group like items together such as scarves, hats, handbags, and so on. Clothes should be grouped together by season.
  • Get rid of wire hangers! Pick up a pack of plastic or wooden hangers each time you go to the store and begin weeding out those wire ones.
  • Use a shoe rack to organize shoes.
  • Keep the boxes for shoes you rarely wear. Label the outside of the box to find it easier when you need them.
  • Group shoes by category such as work out shoes, dress shoes, summer sandals and so on.
  • You can also use a clear plastic over the door shoe bag to hold small accessories such as pantyhose, scarves, hats or belts rolled up.
  • Use wire baskets or canvas bins on the top shelf to hold handbags or off season items.
  • Put hanging canvas shelves on your rod to hold folded items that cannot or should not be hung.
  • Clear plastic stackable drawers or cardboard dressers are great to put in the bottom of the closet to hold blankets or work out clothes.
  • If you’re really tight on space, try putting your heavy blankets or off season clothes in vacuum seal bags.
  • If you only have one rod for your clothes to hang on, consider installing a second rod below for shorter items.
  • Use as much vertical space as possible in your closet.
  • Label bins and containers to make maintaining organization easier.
  • If you have a hard time letting go of clothes, put hangers on the rod backwards. Each time you wear an outfit, hang it the right way. At the end of the season, all clothes still hanging backwards need to go!
  • Hang like items together, this way you see how may pairs of black pants you really have. Enjoy your new organized space!

Wednesday, April 20, 2011

Welcome Burlap Banner

I love love love working with burlap! It is inexpensive and makes anything you put with it look great. Here is my latest quick project with burlap.

 I cut out my squares of burlap by tracing a sheet of paper and tore a long strip of a canvas drop cloth that I had already. You can use any kind of fabric or ribbon for this.

Hot glue the squares to the fabric banner.

Stencil the letters onto the burlap with craft paint and a sponge or brush.
 

I ripped pieces of canvas cloth and tied them around the banner between the letters.

 Fray the ends and the sides as much as you want to.

Hang!